Monday, 15 September 2014

Home-made Strawberry Jam & Super Simple Scones!

Simply Short n Sweet describes me to a tee! I LOVE love love anything that requires minimal effort and time ... especially in the kitchen. I am not a lover of cooking but I do have an insatiable sweet tooth and find myself looking for home-made quick fixes all the time.

This easy-peasy scone recipe is one of those! I found it on Taste and tweaked it just a bit.

Here are the instructions ...

You will need:

Self raising flour
Cream
Lemonade

1. Preheat your oven to 160 degrees celsius.
2. Combine 3 1/2 cups of self raising flour, 1 cup of cream and 1 cup of lemonade. (You can also make your own self-raising flour by combining 1 cup of plain flour with 2 teaspoons of baking powder.)
3. Knead into a dough.
4. Roll out to about 1cm thick and cut into circles. (If you don't have a rolling pin, like me, then simple find something smooth and round like a wine bottle ... and if you don't have circular cookie cutters, like me, then try using the top of a glass)
5. Place onto a lined tray and bake for 15 minutes.

And you can't have scones without jam and cream, but did you ever realise how ridiculously simple it is to make your own fresh strawberry jam??? Since sharing my scone recipe with my family they have all been baking their own scones like they are going out of fashion, so I thought I would try my hand at making strawberry jam as my dad's father's day gift this year. YUM!


Here are the instructions ...

You will need:

4 cups Fresh strawberries
4 cups Castor sugar
1/4 cup Lemon juice
Sterile mason jar

1. Combine equal parts fresh strawberries and castor sugar in a pan. (I was a bit shocked at how much sugar went into jam so I probably only added about 3/4 and it still tasted great.)
2. Use a potato masher to crush the strawberries.
3. Stir over a low heat until the sugar is dissolved, then bring to the boil, stirring continuously.
4. Stir through lemon juice and allow to cool.
5. Transfer to a mason jar.

P.S if you plan to store this in the pantry you'll need to seal the jar, but if using it right away then just pop it in the fridge and it should keep for up to 12months. ENJOY!

Saturday, 13 September 2014

DIY Coaster for Father's Day

Last weekend was Father's Day and my 12 year old is at the age where she can pretty much organise her own gifts (this year she decided to give him a 'News Report' dvd which was me interviewing her on her dad ... we had the skills to film ourselves and then MY dad helped us edit it, adding in the News intro you would see on tv, music and rolling credits at the end. As I had nothing to do with the editing I can't write a post about this, as great an idea as it was!). However my nearly 3month old obviously didn't have any major plans of her own. So, after scrolling through ideas on the internet and coming across the usual stuff that is kind of cute but not very useful, I eventually stumbled upon the idea of turning a hand and foot print into a super-hero (the foot print as the body and the hand print as the cape).


As sweet as this would be on paper, I thought "Why not put it on a coaster and make it useful?" And so I did ... easy!
 
 
Here's how ...
 
You will need:
 
- A small square tile or coaster (about 10cm x 10cm - I used a coaster that we already had in the house, however in the future I will most likely purchase some from a tile shop, craft / hobby shop or hardware store).
- Paper
- Paint and brushes (My super hero is very traditional with a blue suit and red cape, however your main man might have a favourite hero such as batman and you could use different colours accordingly).
- Scissors
- A decoupage glue (this acts as a glue and a sealant)
 
 
Instructions:
 
1. I painted my bub's foot and hand one at a time, using a paint brush. I know from experience (working within a childcare centre) that this can get messy so I had baby wipes nearby for a quick cleanup.
 

2. After brushing the paint onto your child's hand or foot, grip it firmly and press down onto paper. If it's too hard to push your child's foot down onto a hard surface, try lifting the paper up to their foot instead by placing a hardcover book underneath it.

3. Now, I kept the hand and foot print very separate because I wanted to scan them onto my computer. I used Photoshop to position each print on a 10x10cm canvas and then added a superman logo ontop. HOWEVER, you could simply draw a 10x10cm box onto your paper and press your child's foot / hand print down within that box. (If you want to add a superhero logo then a simple print, cut and paste or drawing would still look great!)

4. Add your superhero's arms and head, as well as your text. (Again, I did this in Photoshop, but if  I was to do it again I would just use an artline or black texta.)

5. Once the paint is well and truly dry, cut out your 10x10cm box and carefully stick it onto your tile or coaster by brushing a thin layer of decoupage glue onto the tile. (This will be super hard to move so make sure the positioning is right before pressing down.

6. Brush another thin layer of decoupage glue over the top of the paper, making sure to go over the edges of the paper, then allow to dry for a good couple of days!

And that's it :) You could do this with photos, inspirational quotes, your children's drawings, scrapbook paper ... ANYTHING you like!

Friday, 12 September 2014

Mini Photo Album / Wallet Album

Those of you who read my post on Creative Cards might recall me mentioning the use of photo editing app's on your smartphone or tablet. Well, here's something I created using one called Pic Collage (free!). 


It's a mini / wallet photo album that I made for my husband's most recent birthday. I thought it would be nice for him to have some fun pictures of us all where-ever he goes, especially since our youngest daughter is only just coming up to 3months old and I can only imagine that it must be tough having to spend all day away from her!

Anyway, I love Pic Collage because it is so so easy to use and because you can take images and create gorgeous collages all on the one device, and have that 'scrapbook' look by adding backgrounds, text, borders and 'stickers'.

Here are the instructions ...

What you will need:

- Plastic credit card holder (I picked mine up from StrandBags for $1.00)
- Computer
- Printer
- Scissors

1. Take lots and lots of photos! If you already have some on your smartphone or tablet, GREAT! If you already have some on your computer you can use them as they are, edit them in a computer software program such as Photoshop or transfer them onto your smartphone or tablet via USB, Bluetooth or email.

2. If using a photo editing app then get creating! Make sure that you save each of your creations to your device's photo album. (You will need to transfer these onto your computer once you are finished either by email, USB or Bluetooth).

3. Using Word for Windows, insert all your pictures. Format each so that the length doesn't exceed 8.5cm and the width 5.5cm (about the size of a standard credit card).

4. Print, cut and insert into the plastic credit card sleeves! Too easy :)

DIY Giant Bookmarks


I LOVE reading! Or at least I did before I had to spend much of my time reading university books, journals, papers etc etc while studying for my teaching degree. But now that I've finished studying I'm really excited about being able to get into a good book again. My husband is the same and so is my eldest daughter - we are a family of bookworms.
 
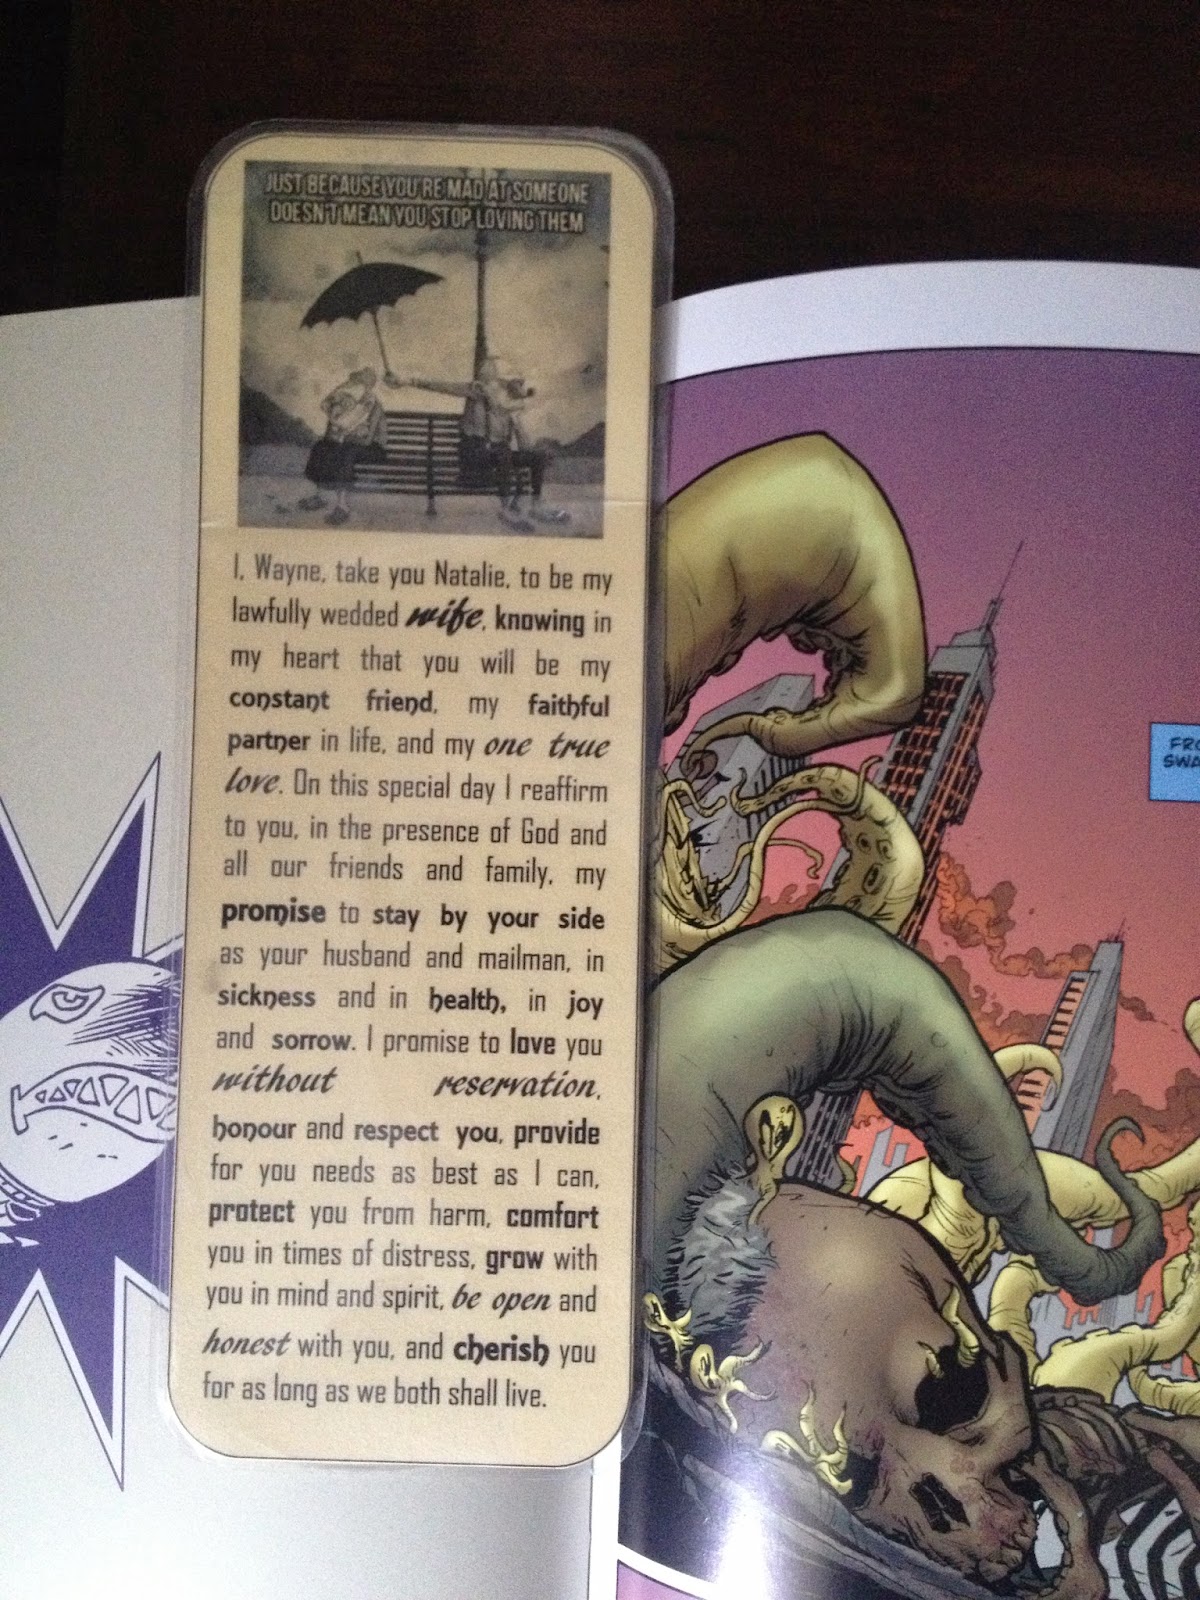
So when my 1st wedding anniversary came around and I discovered that 'paper' was one of the traditional gifts I decided to make my hubby a giant bookmark with our wedding vows written on each side.


It was really easy, as Word for Windows already has a template (however I will include mine at the bottom of this post for you, as I tweaked it just a bit!). All I had to do was type in our vows, add a couple of cute marriage-related pictures, print, cut and laminate. You might not feel the need to laminate yours if you use a thicker card, however as mine was printed straight onto normal paper it needed something extra for durability.
 
I used 3 different fonts when typing the vows; Agency FB was my standard font, while Ar Blanca and Ar Essence were used to highlight words or sentences that I thought deserved a little emphasis. I found the pictures on Pinterest by searching 'Marriage Quotes' and I think that they not only make the bookmark more interesting but they also inspire us in our marriage ... I didn't want just any old soppy love quotes but ones that were honest and fun (two things that my husband and I really value in our marriage);
So True, A successful couple doesn't give up. You only fail when you fail to try.


Anyway, needless to say, hubby is still using his bookmark today and I've gone and made myself one too:


My bookmark serves a different purpose though; I wanted something on hand that would prompt me to pray for my husband and children each day in a way that was genuine and bible-based. I found several different Christian sites that had suggestions for daily prayer, however Florish.me actually had a free downloadable bookmark that included super simple suggestions for praying over your husband daily. What I love about their's is that the prayers are short and sweet, they each refer to a verse in the bible, and each day's prayer begins with the first letter of that day (Monday - Marriage, Tuesday - Thrive, Wednesday - Wisdom etc) making it so easy to remember even when my bookmark isn't directly infront of me. (Of course that's not to say I only ever pray for one particular area of my husband's life on a given day, but it certainly helps get me started).

 
On the reverse side of my bookmark I have daily prayers for my children (these are numbered for each day of the month, as opposed to each day of the week like the ones for my hubby). Because there are so many more I haven't included an actual prayer but rather a theme word and the bible verses that relate to it (for example, Self-control 1 Thessolonians 5:6, Respect 1 Peter 2:17, Courage Dueteronomy 31:6). Again, there are loads of ideas on the internet, however I really liked the one produced by Raising Godly Children and they also have a free downloadable (A4 size and includes short individual prayers).
 
Of course there are so many other ways that you could personalise your giant bookmark - as a teacher I think that having the kids write a poem, paint / decorate or add photos of themselves to a bookmark would make a great gift for mum or dad.
 
Here is the template I used to create my bookmark of prayers (actually I've called them Declarations as I believe strongly in the power of the spoken word and believing that what we ask for in the name of Jesus is already done!) - feel free to dowload it and either use it as is or modify it according to your own needs! Don't forget to share this post with your family and friends xxx


Sunday, 7 September 2014

Creative Cards / Labels


Sometimes pictures can paint a thousand words, so instead of giving a wordy card, maybe consider some creative alternatives with these added bonuses;
 
1. Heaps of fun to make
2. Costs less than a Halmark card
3. The recipient will love it and probably even keep it!
 
The little film strip label shown above accompanied a gift hamper that I made up for my hubby's birthday. It was so simple - all it took was a camera, some clip art (I simply googled 'film strip') and some photo editing software (I love playing around in Photoshop). If you aren't confident with using software such as Photoshop then you can take a scrapbooking approach and simply print each image, cut, and then paste the photos over the top of the film strip.
 
However if you do enjoy a bit of photo editing then you could have a go at the label I created below for my daughter.


Or this birthday card that we sent to our Pop interstate (the hardest part is getting everyone to pose - but even our little dog Denzel Washington managed so you should be fine) ...


We actually turned this card into a fun fridge magnet for him which you could easily do too. You can either purchase magnetic paper, magnetic tape or individual magnets that will adhere to the back of your card.
 
If computer software editing programs are not your thing then have you considered using an app on your smartphone or tablet? Take a look at this little card which I created using a super easy app called Pic Collage:


There are probably hundreds of different app's you could choose from, and the beauty of these is that you can take the photo's and edit them all on the one device. You could even send your card off by email or upload it to a social network instead of posting it in the mail. 


 Okay, now I realise that even an app is getting too techical for some, so lets head back in the direction of scrapbooking and perhaps something like the card below would be more up your alley? All I did in this case was cut out magazine letters to spell my husbands name and then found quotes that began with each of those letters and described him in some way.


Well, that's just a few of the different types of cards / labels I have used for special occasions so far, and I'm sure there will be many many more to come! I'll keep adding to this post as I create more so feel free to subscribe / follow by email :)


Saturday, 6 September 2014

Personalised Gift Hamper

Well, since there seems to be a theme running in my blog so far of all gifts 'thrifty', I thought I'd also share this idea with you ...


This little hamper was another one of my hubby's birthday presents, and they say the way to a man's heart is through his stomach, so although it was no PlayStation or whatever, he was pretty happy!

The trick with creating a gift hamper on a budget is to make it personal. In this case I googled and brainstormed and came up with some sentences that both described my husband and had a play on words that tied in nicely with different snacks ... if you think these would work for your loved one too then here they are (yes some are super corny but that's me haha):

Rocky Road - "You're hotter than 'the Rock' because you are my rock"
M&M's - "You are the Mr to my Mrs, my Mail-Man and Muscle Man" (Mail-man was an inside joke as my hubby always used to say "call me the mail-man because I always deliver")
Mars Bar - "You work hard, rest hard and play hard"
Peanuts - "You're a little bit nutty but I'm nuts about you"
Jelly Babies - "You're soft and sweet"
Chilli Pringles - "You spice up my life ... now that you've popped the question we don't ever need to stop".

(The little film-strip 'card' is a whole other post that I won't get into here ... stay tuned)

Here are the instructions ...

1. Brainstorm! Think about things that your loved one enjoys ... it might not be food so much, perhaps it's for a girl friend or mother that enjoys being pampered (bath salts, oils, creams etc ... you could play on words surrounding the scent, for example "orange you glad we're friends" haha! - yes, I often laugh at my own jokes) or you could give a gift that is seasonal (i.e. a beanie and scarf and label it "you make me feel warm and fuzzy").

2. Create cute little labels to attach with ribbon / string. You can use Word for Windows:

- Add a text box. Format the shape / border / colour etc as desired
- Copy and paste according to how many items will be included in your hamper
- Type in your cute sentences!
- Print, cut and attach :)

Or if you would prefer to skip that, you could simply write onto coloured paper / labels or use my template and personalise the wording ... don't forget to share this post xxx

Friday, 5 September 2014

An Explosion Box!

Here is an idea that I saw on Pinterest and loved ... by the way most of the home-made gifts I make are inspired by versions found somewhere on the net, which is why I'm sharing my creations with you too - how great that we can all inspire each other!

So this gorgeous little keepsake is called an Explosion Box, because once you lift the lid it falls open to reveal loads of little pages, and each page has some-thing special on it which would be meaningful to the receiver.


I created this one here for my husband on his 30th birthday. Inside I added lots of little photos that represented his 30years ... ones from his childhood, of his parents and sister, one of his work, one that represented his faith, holidays we had been on etc etc. All in all there were 21 pages for me to fill as I used both the back and front of the top 2 layers and the front of the bottom layer. This also included a tiny birthday letter that I stuck in the middle.


I had so much fun creating this! Ontop of some of the photos I had glued little captions and once it was all closed up I popped one of his favourite Lindt chocolates in the middle. Granted, this was not whipped up super quickly, so if you plan to do something similar then make sure you give yourself a few days! This could also make such a sweet gift for an anniversary, to celebrate some-ones achievements or simply to let some-one know how special they are!


Here are the instructions ...
 
 
You will need:
 
 - Square scrapbook or coloured paper - the size depends on how big you plan to make you box, and the number of sheets depends on how many layers you want to include in your box. (My box was mini, with each page measuring only 3cm, so I started off with small 10cmx10cm sheets and created 3 layers - so including the lid I needed 4 sheets). If you have rectangle sheets then you can easily make these square by folding one corner down to the opposite side of the page, creating a triangle, before cutting off the bottom rectangle. When you unfold the page again it will be square. 

 - Bits to glue onto each page. I included a tiny letter, lots of photos and some itty bitty captions. You might light to also include newspaper/ magazine clippings, stickers, drawings, quotes etc.

 - Scissors and glue.

1. Fold your square sheets into thirds both vertically and horizontally, so that when you open it out again it has 9 squares.

2. Cut out the corner squares, leaving a centre square and four pages coming off each side.

3. Glue the centre's off each layer ontop of one another.

4. Add your special bits and pieces to each page!

To make the lid:

1. Fold the last sheet of paper into thirds as before, then measure and draw a line 2cm from the edges of the centre square. (So you will have a larger square draw around the centre square).

2. Cut out around the square you have drawn.

3. Fold each edge in along the lines of the smaller square, then fold in the corners and glue down.